服务器基础配置

centos默认安装了sshd,查看sshd的端口号

1
/etc/ssh/sshd_config

修改防火墙配置为sshd端口可访问

1
2
3
4
5
6
7
8
9
10
11
12
13
# 开启防火墙
systemctl start firewalld.service
# 开机自动启动防火墙
systemctl enable firewalld.service
# 重启防火墙
systemctl restart firewalld.service
# 查看防火墙状态
firewall-cmd --state
# 修改防火墙设置为22端口可访问
firewall-cmd --zone=public --add-port=22/tcp --permanent
# 修改防火墙设置为22端口不可访问
firewall-cmd --zone=public --remove-port=22/tcp --permanent
firewall-cmd --reload

在本地(Windows下)生成私钥

1
ssh-keygen -b 4096 -t rsa

然后把.pub公钥写到服务器上

1
2
3
4
echo ".pub密钥内容">>/root/.ssh/authorized_keys     
#编辑完成后还得修改权限
chmod 600 ~/.ssh/authorized_keys
chmod 700 ~/.ssh

修改/etc/ssh/sshd_config为允许密钥登录并且拒绝密码登录

1
2
3
4
RSAAuthentication yes 开启RSA验证
PubkeyAuthentication yes 是否使用公钥验证
AuthorizedKeysFile .ssh/authorized_keys 公钥的保存位置
PasswordAuthentication no 禁止使用密码验证登录

服务器v2ray搭建

安装V2Ray

1
bash <(curl -s -L https://git.io/bwg_v2ray)

会生成一些配置信息

然后把对应的端口防火墙打开,去https://tcp.ping.pe/测试是否可通

常用命令

1
2
3
4
5
6
# 打开管理页面
v2ray
# 查看配置
v2ray info
# 查看内核版本
v2ray V

Windows配置v2ray客户端

参考

1
https://github.com/bwgvps/v2ray-tutorial/wiki/Windows%E5%AE%A2%E6%88%B7%E7%AB%AFv2rayN%E4%B8%8B%E8%BD%BD%E6%96%B9%E6%B3%95%E4%B8%8E%E4%BD%BF%E7%94%A8%E6%95%99%E7%A8%8B

Linux配置v2ray客户端

内核安装

在Linux 上下载并安装 v2ray 内核,要求客户端内核版本和服务端内核版本大版本一致

1
2
# 5.16.1内核版本下载地址,下载v2ray-linux-64.zip
https://github.com/v2fly/v2ray-core/releases/tag/v5.16.1

把解压后的文件全部移动到/usr/local/v2ray-core,没有则新建这个目录

1
sudo mv /home/yu1e/Desktop/v2ray-linux-64/* /usr/local/v2ray-core/

创建geoip.dat和geosite.dat的文件夹,并移动文件

1
2
sudo mkdir -p /usr/local/share/v2ray/
sudo mv /usr/local/v2ray-core/*dat /usr/local/share/v2ray/

v2rayA安装

1
https://github.com/v2rayA/v2rayA/releases/

查看内核

1
cat /proc/version

下载deb文件并安装

1
2
# 必须加./不然报错
sudo apt install ./installer_debian_x64_2.2.4.6.deb

配置 v2rayA

修改/etc/default/v2raya配置文件让 v2raya 使用 v2ray-core

1
2
3
4
5
6
# vi /etc/default/v2raya

# 将V2rayA和v2ray-core关联起来
# 添加配置两行配置
V2RAYA_V2RAY_BIN=/usr/local/v2ray-core/v2ray
V2RAYA_V2RAY_CONFDIR=/usr/local/v2ray-core

设置开机启动

1
2
3
4
5
# --now 参数表示设置为开机启动并立即启动v2raya
sudo systemctl enable --now v2raya

# 查看服务状态
systemctl status v2raya

使用v2ray

在浏览器中打开 v2rayA web 管理界面 http://localhost:2017/

第一次会要求设置账号密码

如果忘记密码

1
sudo v2raya --reset-password

登录进去之后点右上角的import,填上前面生成的链接

在server页面可以看到节点,左上角的按钮有ready,点一下变成running就说明没问题

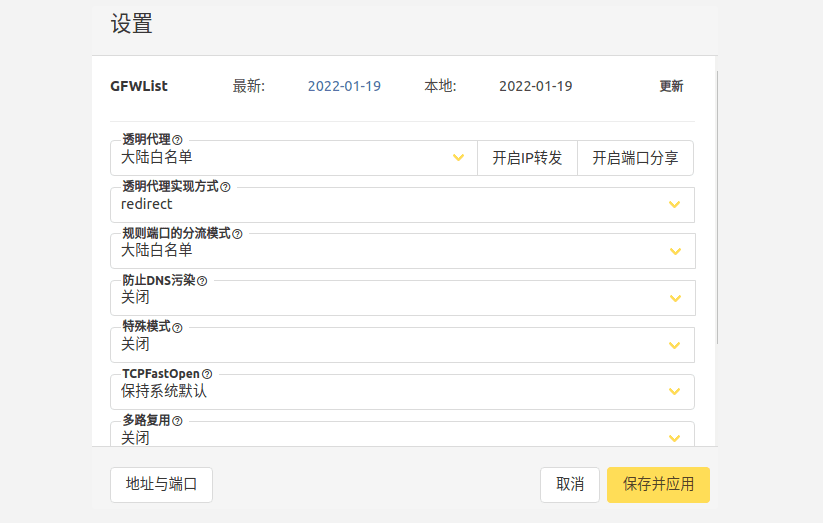
然后在settings中需要先设置不分流流量,然后选直连,本地更新GFW白名单(settings中有update按钮)之后再选白名单

v2ray.png

offsec的v2ray配置文件配置

json配置文件

1
2
3
4
5
6
7
8
9
10
11
12
13
14
15
16
17
18
19
20
21
22
23
24
25
26
27
28
29
30
31
32
33
34
35
36
37
38
39
40
41
42
43
44
45
46
47
48
49
50
51
52
53
54
55
56
57
58
59
60
61
62
63
64
65
66
67
68
69
70
71
72
73
74
75
76
77
78
79
80
81
82
83
84
85
86
87
88
89
90
91
92
93
94
95
96
97
98
99
100
101
102
103
{
"log": {
"access": "",
"error": "",
"loglevel": "warning"
},
"inbounds": [{
"port": 1195,
"listen": "127.0.0.1",
"protocol": "dokodemo-door",
"settings":
{
"address": "vpn-pool1.offseclabs.com",
"port": 1194,
"network": "udp",
"protocol": "",
"followRedirect": false
}
}
],

"outbounds": [
{
"tag": "proxy",
"protocol": "vmess",
"settings": {
"vnext": [
{
"address": "xxx", #改这里
"port": xxx,#改这里
"users": [
{
"id": "xxxx",#改这里
"alterId": 0,
"email": "t@t.tt",
"security": "auto"
}
]
}
]
},
"streamSettings": {
"network": "tcp"
},
"mux": {
"enabled": true,
"concurrency": 8
}
},
{
"tag": "direct",
"protocol": "freedom",
"settings": {}
},
{
"tag": "block",
"protocol": "blackhole",
"settings": {
"response": {
"type": "http"
}
}
}
],
"routing": {
"domainStrategy": "IPIfNonMatch",
"rules": [
{
"type": "field",
"inboundTag": [
"api"
],
"outboundTag": "api",
"enabled": true
},
{
"type": "field",
"outboundTag": "proxy",
"domain": [
"geosite:google"
],
"enabled": true
},
{
"type": "field",
"outboundTag": "direct",
"domain": [
"domain:example-example.com",
"domain:example-example2.com"
],
"enabled": true
},
{
"type": "field",
"outboundTag": "block",
"domain": [
"geosite:category-ads-all"
],
"enabled": true
}
]
}
}

再修改openvpn的配置

1
2
3
4
5
6
7
8
ncp-ciphers AES-256-GCM:AES-256-CBC
cipher AES-256-CBC
auth SHA256
float
remote 127.0.0.1 1195 udp
verify-x509-name "offensive-security.com" name
<ca>
....

先跑v2,再拨ovpn,这种只能做靶机,不能上外网

1
./v2ray run --config=xx.json